

We’ve finally gathered all of the tick removal tools and supplies that we’ve been collecting over the past few months and created an official Tick Kit. From now on, it’ll be joining us on our forest school drop offs and pick ups, trips to the cottage, on hikes and to Young Herbalist Club. I’ve seen various types of Tick Kits out there, and to me, there’s honestly not one that seems better than any of the others, so go ahead and make one to suit your own personal preferences and needs. You want to take every precaution to prevent ticks from latching on in the first place, but if it still ends up happening – which it undoubtedly will if you’re outdoorsy and/or live in a Lyme-endemic area – you wanna make sure to get that sucker off, and fast!
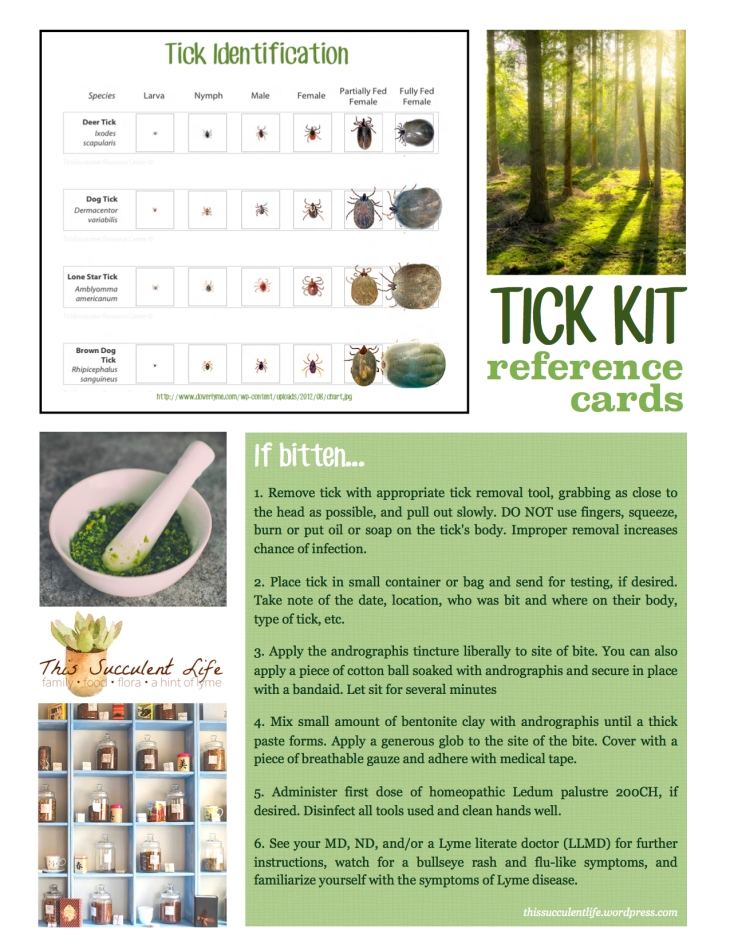
The main components to think about when creating your own kit, which I’ll explain in detail below, are: Proper tick removal, tick preserving and labeling, bite care, and after-care. I’ll also include a free printable PDF for you to include in your Tick Kit, if desired; it includes a tick identification chart and a tick bite cheat sheet, as pictured here:
Proper tick removal
Ticks can be the size of a pinhead in their larval stage, so you can easily mistake them for a freckle or a beauty mark, and you can likewise mistake a small scab or fleck of dirt for a tick. So before you go panicking or digging into someone’s flesh with tweezers, make sure what you’re removing is actually a tick by holding a magnifying glass to it and inspecting it. It’s essential to note that nymph and adult ticks have 8 legs, but larval ticks only have 6.
Removing the tick intact and without causing it distress is your best bet for preventing the spread of infection. To do this, you want to make sure that you avoid twisting, burning or applying pressure, oils or soaps to the tick’s backside, or else the tick could regurgitate in your bloodstream thus heightening your chance of contracting Lyme or one of the many other tick-borne infections. It’s important to grab the tick firmly by the head, as close to the mouth as possible, then gently and continuously pull until the tick releases from its host.
The tool to use will be dependent on each individual situation (where the tick is on the body, whether on animal or human, the size of the tick, etc.) and on the personal preference and comfort level of the individual using the tool. It’s a good idea to keep more than one type of tick tool in your kit to be able to address different circumstances with the right tool. You can use a tick key, a lasso, a straw and thread, a tick spoon, tweezers, or a tick twister (the latter should only be used as a sort of crowbar, and not for twisting the tick). We’ve personally had very much luck using the tick key for adult ticks, but for ticks in the larval and nymph stages, tweezers are what we prefer to use. You can see in the picture below that I’ve kept the packaging for the tick key. I did this because the reverse has instructions on how to use it. You may want to keep any packaging or instructions detailing how to use your tick-removing tool in your Tick Kit, too.
Tick Preserving and Labeling
Once you’ve removed the tick, place it in a small container or bag and seal it well. You can use medical tape and a marker to label the jar, or you can use a pen and notepad to jot down all relevant information, such as the date, location, who was bit and where on their body, type of tick, etc. When I get home, I add that information to our health binder. Some people like to keep clear tape and a small notepad or a piece of cardstock in their Tick Kit in order to tape the ticks they remove directly onto the pages where they can pencil in all relevant information. I do not do this; I prefer to keep my tick in a ziplock on my counter for months and shout profanities at it when I’m having a bad Lyme day. (Ha… Actually, our ticks just sit around the house because I haven’t yet figured out the best place to send them off for testing.)
To help identify the type of tick that was attached, I found a chart (pictured below) with clear illustrations of four of the most common ticks that you’ll find on yourself and your pets, in their various stages. You can print it out and laminate it, if you wish, then add it to your Tick Kit for convenient identification. This information will come in handy for figuring out whether the tick is likely to carry Lyme and/or certain co-infections.
Bite Care
I highly recommend keeping a pen or marker in your Tick Kit to draw a circle around the tick if it’s small, unless it’s clearly been embedded for a long time and the area is inflamed, hence very obvious. We recently extracted a tick from a friend’s child’s back, and the tick was so tiny and hadn’t been attached for very long, that by the time we got home and tried to treat the bite, we could no longer find where it had been embedded.
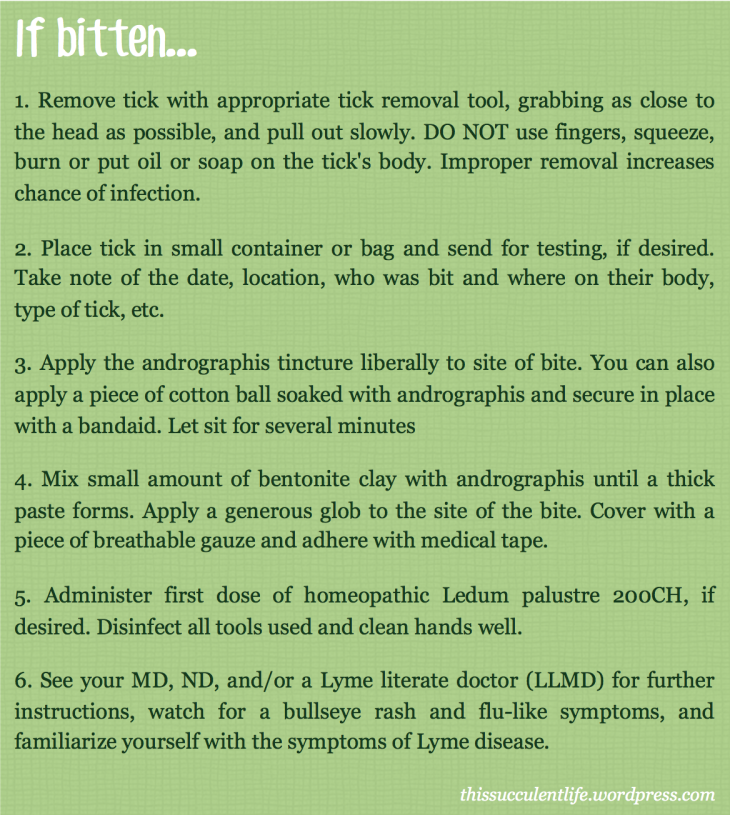
After carefully extracting, preserving and labeling the tick, I follow Master Herbalist Stephen Buhner’s advice of applying andrographis tincture to the bite site. The lyme bacteria is called a spirochete thanks to its spiral shape and the way it screws down to burrow into tissue. According to Buhner (Healing Lyme, second edition): “Andrographis is the best anti-spirochetal for borrelial infections. […] We have seen very good results in preventing Lyme infection if Andrographis tincture is applied to the tick bite as soon as the tick is removed.” His instructions for use are as follows: “Remove tick, liberally apply Andrographis tincture to bite site, cover with a moistened glob of bentonite clay, cover that with thin cotton, and leave on for twelve to twenty-four hours. From reports, this seems to prevent active infection nearly every time.”
After using the dropper to apply the andrographis, I allow it to sit for several minutes on the bite site to be absorbed. If you’re dealing with a fidgety child or the bite is in a very awkward location on the body, you can soak a cotton ball with andrographis and secure to the bite site with a bandaid. After about 10 minutes, you can remove the ball of tincture-soaked cotton and apply a glob of bentonite clay which has also been moistened with andrographis tincture. You can use a small silicone or medicine cup and a popsicle stick to stir them together to form a thick paste. Once the poultice has been applied, I cover it with a sheet of gauze and secure with medical tape, then leave on for about 24 hours.
After doing bite care, you can administer the homeopathic Ledum palustre 200CH or 1M, if this is something you wish to do, and continue to do so for at least 3 days. In simple terms, Ledum is said to repel any foreign matter or infection that attempts to enter the body at the site of a puncture wound of any kind. Surprisingly, it was a pharmacist that recommended this protocol to me, and I’ve since heard of it being recommended by a local Lyme-literate doctor (LLMD). Whether you choose to follow this step or not is to your discretion; take it or leave it. You can administer the Ledum at any point after discovering the embedded tick, however it is said that the sooner this protocol is initiated, the better the outcome.
After-Care
At this point, you may want to be in touch with your doctor and/or an LLMD/LLND so that they can document the bite and administer antibiotics and/or initiate an herbal protocol. All the while, you should keep an eye out for a bullseye rash and flu-like symptoms. I also highly recommend you learn the symptoms of Lyme disease, since it’s well-known in the Lyme community that you can do everything “by the book” and still end up with Lyme disease. If symptoms do arise, Lyme treatment should be initiated immediately.
To summarize…
 The items I keep in my Tick Kit are:
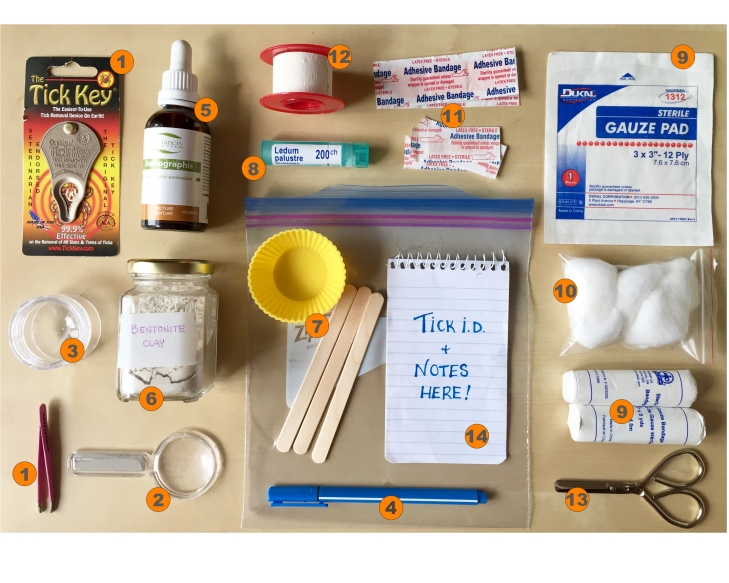
1. Tick removers of choice: Fine-tipped tweezers, Tick Key, Tick Twister, thread and straw, etc.
2. Magnifying glass
3. Clean specimen jar or small pill container
4. Pen or marker
5. Andrographis tincture
6. Bentonite clay
7. Small silicone cup or medicine cup and popsicle sticks (in ziplock bag)
8. Ledum palustre 200CH
9. Various shapes and sizes of sterile gauze pads
10. Cotton balls
11. Bandaids
12. Medical tape
13. Small pair of scissors
14. Notebook
15. Tick Bite Reference Cards PDF (Click to save, print, cut and laminate, if desired!)
Last but not least, make sure to find a case or pouch to carry everything in.
Be well,
Anna


Thank you, Anna! Where do you buy your clay?
LikeLike
You’re welcome, Lisa! The bentonite clay can be found locally at Rainbow Foods, Market Organics, Mother Earth, Kardish, etc.
LikeLike
You’re amazing. Full of valuable information……Thank you xoxoxoxo
Love you, Mom
LikeLike
Thank you Anna – it’s very helpful to have the information assembled in one place with clear instructions and reasons for each step of tick removal and initial treatment.
LikeLike
I’m glad you found this post helpful Jenya!
LikeLike
I’m making one – thank you for the idea!
LikeLiked by 1 person
great info, where do you obtain the Andrographis tincture?
LikeLike
I’m in Canada and really like St. Francis Herb Farm brand as they seem to be a reputable company with high standards. They’re also relatively local to me. Herbie’s Herbs is another company I’ve dealt with and recommend. I hear they ship internationally. If you’re in the US, Buhner stands behind and strongly recommends Woodland Essence’s products.
LikeLike
And thank you! 😊
LikeLike
You are amazing! I will be sending this to everyone!
LikeLike
Hi Elicia 🙂 Thank you for the kind words and for spreading the word!
LikeLike
Thanks for the write up- I wish that I had a kit assembled as we removed a tick from my son this weekend. I believe my husband removed it correctly but we didn’t follow up with disinfectant or other treatment 😦 Do you think it’s worthwhile to do now or just watch for symptoms? It’s been two days.
LikeLike
Hi Jaime,
Sorry to hear about your son’s tick bite. I’m glad to hear that you were able to remove it properly! I’m not a medical professional, but my personal opinion is that every bite should be treated. I choose a natural antibiotic approach for my family, but others choose conventional antibiotics. Either way, the consensus is to treat for at least a month. A LLMD/LLND can help you build a suitable protocol, should you choose to treat. I have a little bit more info on my post entitled All About That Bite. Best of luck!
LikeLike
Anna, You are so kind and generous to share this, thank you.
I just purchased some tick removal tools, which makes me feel a bit more prepared, but l didn’t realise there was so much more l could do. Certainly l will be making up a kit like this and carrying it with me.
I live in Norfolk, England and as an aromatherapist l have used and know of bentonite clay but now need to locate the drographics ticture too, and ledum palastre, plus find out where to locate my local doctors who are LLMD/LLMD.
Your practical ideas and information are very much appreciated, so to the photo of your kit and the numbered key.
This is the most helpful information l have ever read. THANK YOU.
LikeLike
Such kind words, Frankie – thank you! I hope you can source the rest of your tick kit items without issue. I also hope you never have to use them! 🙂
LikeLike
Thank you so much for this! I’ve been looking for a way to feel more empowered and not at the whim of ticks. Thank you! Also, I can’t figure out how to print the printables. Am I missing something?
LikeLike
You are so welcome! I am very happy to hear that this empowers you! That is my goal in sharing this information.
To print the PDF, go to #15 on my list at the bottom of the post and click the link. It’ll open the PDF in a new window and you should be able to print it as you would any other document in a browser window. I hope that helps!
LikeLike
Thanks for this, Anna.
We have now created, and will be travelling everywhere with, our Tick Kit. I am not sure that I understand why you use the bentonite clay as a poultice? Wouldn’t a soaked cotton ball serve just as well?
Also, is it only deer ticks that can transmit diseases?
Also, emergency room docs are still saying “lucky that we got that tick within the prescribe xx hours!” What is the source of information that I can point them to to show that transmission can occur within minutes/hours? I understand that increased exposure = increased risk, but removal within ___ hours does NOT guarantee no transmission, as the medical professionals are claiming. EEK.
LikeLike
Hi Wendy!
Bentonite clay is highly absorbent and will help to extract any substances that may have been expelled during feeding or removal of the tick. A cotton ball will work to saturate the area with andrographis in order to disinfect the bite site, which is what I would personally recommend to treat the puncture wound in those first few minutes after removing the tick, but the bentonite clay/andrographis poultice will work together to pull and disinfect thereafter.
Deer ticks are absolutely not the only kinds of ticks that can carry and transmit diseases; all ticks can and do. While deer ticks are the most likely to infect humans with Lyme, others have been known to carry Lyme, although sometimes in smaller numbers, and while other ticks may not commonly be known to carry Lyme, they can be more likely to carry other types of disease, like babesiosis, Rocky Mountain spotted fever (RMSF), tularaemia, etc., all of which can be as troublesome – or more so – than Lyme itself.
As for the transmission rate of infection of Lyme via tick, that has not yet been established. Contrary to the outdated belief of many in the medical community that infection doesn’t occur before the 24-48 hour mark, there is evidence to suggest pathogen transfer after a mere 10-minute embedment time (https://www.ncbi.nlm.nih.gov/pmc/articles/PMC4278789/). Furthermore, Dr. Willy Burgdorfer (where Borrelia Burgdorferi, aka Lyme, gets its namesake, since Dr. Burgdorfer was the man who discovered the bacterium back in the 1980s), also believes that transfer can happen within minutes.
I hope you find this helpful, and let’s hope you never have to use that tick kit! 🙂
LikeLike
I live near Lyme CT. It is so helpful to find this information and I learned a lot. I’ll be puttng my tick kit together. Here are some tick tips I collected over the years. You already mentioned Buhner’s book!
– Every time I finish working in my yard I do this: put all clothes in the drier on medium for at least 20 minutes. Everything. This helps desiccate and kill ticks. Do this before washing them even though it sounds backwards. Ticks like damp/wet environments and washing is not a good way to kill them and makes it harder to kill them in the drier when clothes are wet after washing. I usually have to go back outside to finish the job the next day anyway, so it’s easy to get the same clothes out of the drier.
– Shower immediately!
– Always assume there are ticks in your yard. Unless there is a feet of snow and it’s 20 below 🙂
– Get a tick disease test now as a baseline. This was called the Western Blot Panel in the past, but it might be different now or my new doctor might be confused. It’s a 40 panel blood test for all known tick borne diseases. Most ticks with Lyme in my area carry other diseases too, like babesiosis, etc that are easier to test for. Getting this done before you get bit lets you know what you’ve already been exposed to. This is always the best way to test for Lyme, because the Lyme test alone is not very accurate, but I only found 1 doctor in this area who understood how to order this test and she sent me to a specific lab and drawing station near her office. She called with the results immediately. If you turn out to be negative for all tick borne disease antibodies (whew!) you’ll know that in the future which can help you relate new test findings to a specific bite. Back in 2009 I found a Lyme literate doctor via one of the Lyme disease websites. Yes, even at the epicenter of this disease there was only one doctor listed, and she was 40 minutes away. It was worth the trip to talk to someone who knew what she was doing.
-Mice are the primary reservoir of the disease, and ticks get it from feeding on mice. Deer have no more to do with it than birds, humans, dogs, and other tick targets. However, we have a mice epidemic caused by new types of poison. Audubon had a great article on this. The new poisons should not be on the market but are: they end up killing all the natural mice/rat predators to the point where all owls and hawks that get tested in this area already have almost lethal amounts of this poison. The rest are already dead. Same for fox and coyote. In this area they predict the next year’s tick population from the current population growth of the mice. This is being caused by the new poisons. There are better ways to get rid of mice than these new poisons. Finally possums are “tick vacuum cleaners.” They feed on ticks as they groom themselves. I’m happy to see all my neighbors cats patrolling my yard! Some info courtesy of CT agricultural program entomology dept., Audubon Magazine (online), and other sources.
LikeLike
Thank you for your kind words and helpful advice, Jim! I wish we had possums up here in Canada. 🙂
LikeLike
Hello, my name is Megan. I am wondering where did you get your Ledum palustre 200CH and is the the natural antibiotic that you take as a precaution after being bitten instead of regular antibiotic? Thanks!
LikeLike
Hi Megan,
I got the Ledum at a compounding pharmacy. You can also get it at health stores. The andrographis is used topically. Since I’m not a health practitioner, I cannot make any formal recommendations, however I personally believe that every bite should be treated with a round of antibiotics; whether you choose to treat conventionally or holistically is to your discretion.
LikeLike
Hi Megan,
I got the Ledum at a compounding pharmacy. You can also get it at health stores. The andrographis is used topically. Since I’m not a health practitioner, I cannot make any formal recommendations, however I personally believe that every bite should be treated with a round of antibiotics in addition to the bite protocol listed above; whether you choose to treat conventionally or holistically is to your discretion.
LikeLike
You rock! Very impressive and thoroughly done. I’m a Lyme Survivor and Advocate and just posted this in several of the FB Lyme related groups. Bravo!
LikeLike
Thank you so much for the kind words, Kelley! And I have to say that you are equally awesome for being a Lyme survivor and advocate. Good for you! We need more awareness in this area, for sure. Thank you for sharing my post.
LikeLike